Learn the Art of Worm Composting To Recycle Your Own Food Scraps
How to start and maintain an indoor vermicompost bin—and get closer to zero-waste in your home
Photo by Neslihan Gunaydin on Unsplash
This article was first published on Medium in Better Humans, it is republished here with the permission of the author.
This is a guest post by Sarah R., an energy & environment professional based in Washington, D.C. For more on these topics, please follow her on Twitter!
Worm composting, also known as vermicomposting, is one of the most extraordinary ways to practice zero waste. A healthy worm bin can divert pounds of food scraps each week from landfills, and instead, turn that “waste” into a nutrient-rich soil amendment known as “black gold.”
Composting — both vermicomposting and outdoor hot composting — are critically important household solutions to food waste. According to the EPA, food scraps account for almost a quarter of the material that ends up in landfills. When they decompose anaerobically in landfills, foods release methane, a powerful greenhouse gas contributing to climate change.
In contrast, worms process these food scraps by consuming them. Their “excretions,” worm castings, are a nutrient-dense compost material that can be added to garden beds and indoor container plants to boost soil moisture retention, fertility, and porosity. In other words, vermicompost is a soil health superfood.
Although vermicomposting can be done outside, it is uniquely suited for those with limited or no outdoor space. A medium-sized 15-gallon worm bin in your house or garage can contain a pound of worms, which in turn can process 1–2 pounds of food scraps every week. Within a few months, your bin will be full of ready-to-harvest compost.
I became interested in vermicomposting when a friend asked me to take care of her worm bin. The experience motivated me to start my own bin. I read as much as I could about vermicomposting, gathered supplies, and ordered my worms online. The first week was the most daunting part of the journey — the period when you have the least experience and the highest probability of complications. Feeling the difference between an overly wet bin and good, moist conditions comes with practice. But I learned that remedies to some challenges— like dealing with an ant invasion — are only a Google search away.
Starting my worm bin has been an overwhelmingly positive experience. It’s provided an endless source of awe and fascination in my household, as we marvel each week at the disappearance of our food scraps in the vast tangles of worms. Keep reading to learn how to start your bin, maintain a healthy bin environment, and troubleshoot the most common issues worm composters face.
Why You Should Vermicompost
There are many reasons to start a worm composting bin:
1. Practice zero waste and keep food out of landfills. Seriously, this is a highly impactful action you can take to keep valuable nutrients in circulation and methane out of the atmosphere. As a climate-conscious person, this is the main reason I started composting.
2. It is the most time-efficient way to deal with food scraps. No need to drop your scraps off at a city composting facility. Just store them in your fridge and add them to your bin once a week.
3. Harvest your own nutrient-rich compost. Vermicomposting is a win-win — good for the environment while also yielding a valuable side product. Use your compost, gift it to fellow plant-lovers, or sell it to local gardeners.
4. Vermicomposting is a fun way to introduce kids (and adults!) to food waste solutions. I have really enjoyed setting up and maintaining my worm bin, especially when I open my bin every week and see that the food scraps have disappeared.
5. Your city may offer rebates and other incentives that offset the cost of starting a worm bin. Washington, DC, for example, offers residents a $75 rebate on the purchase of a worm composting system.
How To Start a Worm Bin
YouTube video of NC State extension specialist Rhonda Sherman on how to start and maintain a worm bin.
Gathering the supplies
Setting up a worm bin is easy with the right materials. Here’s what you’ll need:
- An opaque plastic bin with a lid (10 to 20 gallons recommended), plus extra bin bottom for drainage.
- Power drill
- Brick of coco coir, rehydrated
- Handful of outdoor soil
- Shredded newspaper
- Food scraps
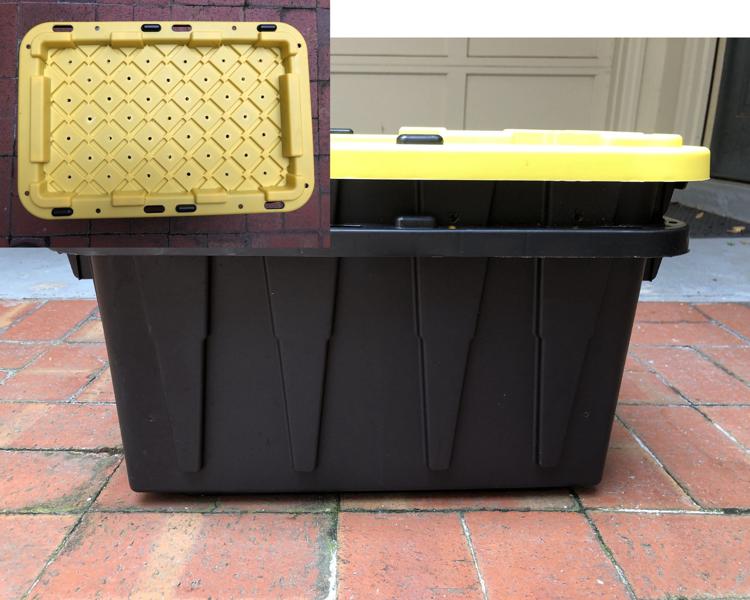
Bin lid with air holes and side-view of the nested bin system. Photos by author.
Assembling your bin
I chose a do-it-yourself nested bin system consisting of an inner bin — your compost bin — that sits inside an outer bin, which catches any excess drainage. Worms are very sensitive to light, so make sure to get opaque or dark-colored bins when you’re shopping for supplies.
We’ll first focus on the inner bin and lid. Start by drilling holes in the bottom of the bin (to allow for drainage), along the top edge of bin, and in the bin lid (for air circulation). There’s no right or wrong number of holes, but you want to drill enough holes to allow for good air circulation. Next, sweep out the plastic residue, rinse the bin, and allow it to dry. Place the bin with the holes inside your extra bin bottom, which will serve as the outer bin in your nested bin system.
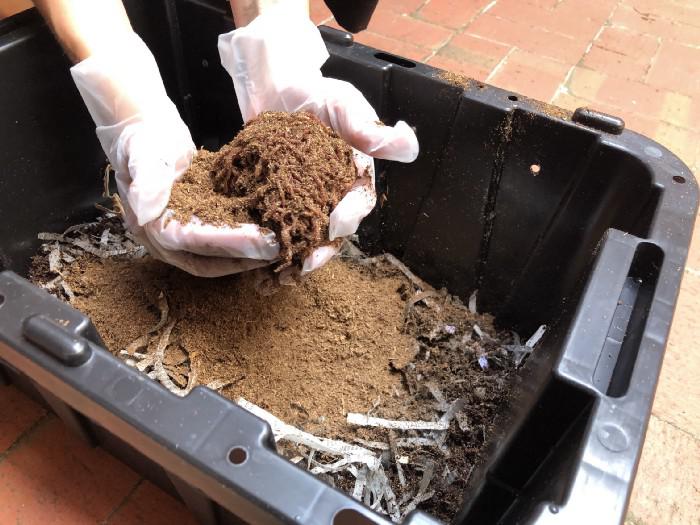
To create the bedding for the inner bin, rehydrate your brick of coco coir and add in enough coir to cover about six inches up from the bottom of the bin. Make sure to wring out any excess wetness from the coco coir before you add it in. You can also add shredded newspaper to the bedding by soaking the strips of newspaper in a bucket of water for 10 seconds, wringing it out, and then mixing it into the bedding. Add a handful of outdoor soil to your bin, which will introduce beneficial microorganisms and provide grit for the worms to grind down the food. Add food scraps right before you place your worms in the bin.
Procuring composting worms
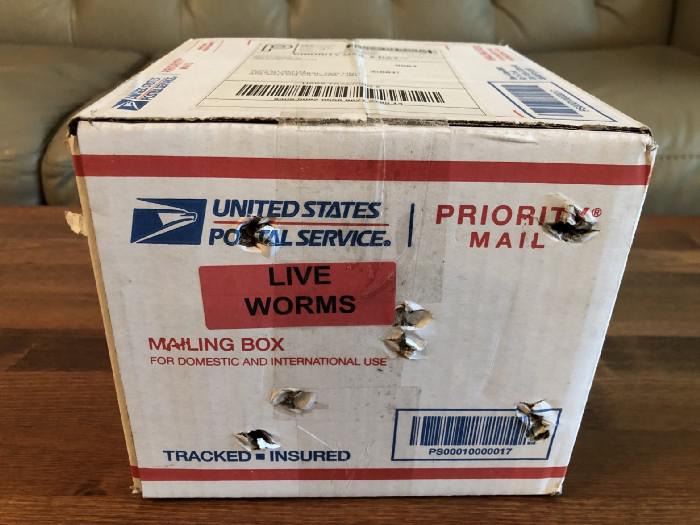
Large shipping box filled with worms- This is how my worms arrived in the mail. Photo by author.
The worm species best-suited for vermicomposting in North America are Eisenia fetida worms, or red wigglers. Find a reputable source and double-check the Latin name to make sure you’re getting the right species. You can order worms through reputable online worm growers like Uncle Jim’s and Meme’s Worms.
Most vermicomposters recommend starting with one pound of worms, which is best suited to a 15– to 20-gallon bin. Since I chose a smaller bin (7 gallons), I ordered half a pound of worms.
Feeding your worms
Worms can eat most raw vegetable and fruit scraps, including rinds and peels. The size of your food scraps will determine how long it takes for the worms to process them. Chopping your scraps into smaller pieces provides more surface area and enables the worms to break the food down faster.
Fruits and veggies gone bad? All is not lost — toss them in the worm bin. That said, there are a few items you’ll want to avoid putting in your bin: citrus, onion, garlic, and spicy foods. Also, never feed your worms meat, bones, dairy, or processed foods.
You should aim to feed your worms once a week. This allows them to eat through the scraps before you put new scraps in and minimizes disturbances to the bin. Store food scraps collected throughout the week in a small lidded container inside your fridge. Refrigerating the scraps is highly effective at slowing decomposition and preventing odors before it's time to put them in the worm bin.
When adding food scraps to your bin, I recommend alternating the side of the bin that you place the scraps in each week. To add the scraps, pull some of the bedding to the side, place the scraps inside the ditch you created, and then cover them with a thin layer of the bedding. Top it off with a handful of shredded newspaper. Covering the food scraps with a layer of bedding and shredded newspaper will help prevent fruit flies, ants, and other pests from being attracted to your bin.
Adding the worms to the bin for the first time. Photo by author.
Tips for maintaining a healthy worm bin
Find the right balance of food scraps. Within a few weeks of starting your bin, you’ll be able to gauge how fast the worms eat through your food scraps. Healthy worms can eat about 25% of their body weight each day, which means that a pound of worms can eat around 1.75 pounds of food scraps each week. Cutting chunks of food scraps into smaller pieces will make it easier for the worms to eat through the scraps.
Place food scraps in the top two inches of the bin, covered by bedding and shredded newspaper. Red wiggler worms live and feed in the top layer of the bin, so keeping their food source on the surface is key. By covering your scraps, you avoid any food smells and pests that are attracted to a smelly bin.
Do not feed your worms meat, dairy, oily, or processed foods, which can cause harmful conditions in your bin. Also, worms can be extra sensitive to citrus, onion, garlic, and spicy foods, so it is recommended to avoid placing these scraps in the bin.
The worm bin medium should have the moisture consistency of a wrung-out sponge, equating to around 80% moisture level. Maintaining a good moisture level is critical since worms breathe through their skin. Food scraps will naturally introduce moisture into the bin, but if conditions get too dry use a plant mister or spray bottle to add water. Keeping a lid on your bin will also help it retain moisture.
What happens if I’m away from home for extended periods? Not to worry, worms can survive without input for several weeks under the right conditions; in fact, they prefer not to be disturbed more than what is necessary to maintain the bin. In addition, their bedding—coco coir and shredded newspaper — is edible and the worms will consume their bedding over time. Before you leave on a trip, make sure the bin is located in a cool place, food and shredded newspaper have been replenished, and the moisture level is right.
Basic Troubleshooting
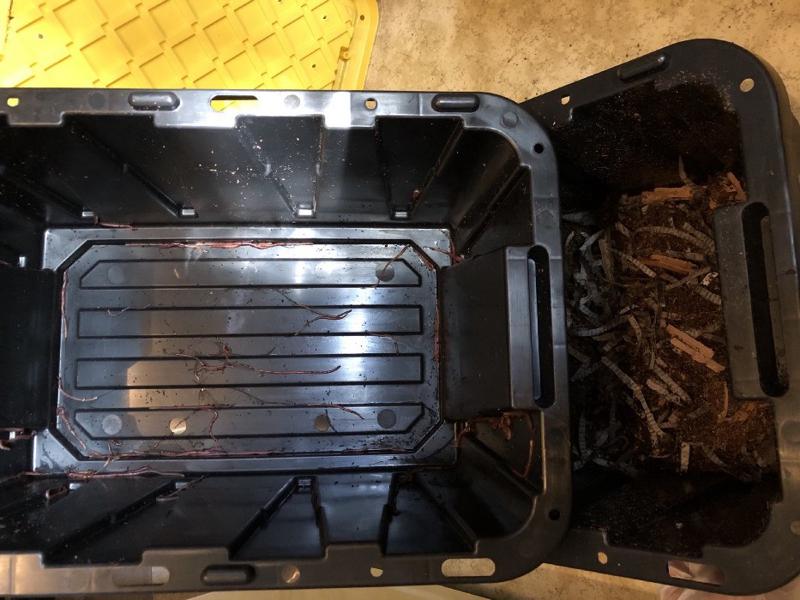
Worms escaping the inner bin through the drainage holes during the first few days of starting the bin. The bin shown at the top of the photo is the outer bin, propped up to show the interior. Photo by author.
Are worms escaping your bin? That’s normal in the first few days as they adjust to their new environment. Worms actively avoid light, so leave the lid off and place the bin under a bright light source for the first couple of days. Check the bin regularly during that time to return any rogue worms to the bin before they dry out. Worms can also be sensitive to vibration and may flee the bin if it is near a source of vibration (e.g., a washing machine). If large groups of worms start to flee an established bin, then the conditions might be inhospitable. Check conditions like moisture, the content and amount of food, air circulation, and other environmental conditions that may be affecting the bin.
Did you add too much water to your bin? If your bin conditions become soggy or wet, you can rebalance the bin by adding more shredded newspaper to soak up the extra moisture. You can also leave the lid off to enable evaporation and wait a few days before putting food in to bring down the moisture level. You should only be adding water through a mister or spray bottle — never pour water directly into your bin.
Is your bin getting smelly? Your bin should smell pleasantly earthy, not stinky. There are a few possible reasons for a bad-smelling bin. Your bin may develop an unpleasant odor if #1 you are putting more food scraps in the bin than the worms can consume, #2 you are not properly covering the food scraps, #3 the bin conditions are too wet, or #4 there’s not enough air circulation.
Starting my worm composting bin was one of the most interesting and impactful things I did this spring. The process brought renewed awareness of food waste to my household and, ironically, prompted me to adopt new practices to reduce the amount of fresh food that goes bad in the first place. Share your composting stories and tips in the comments below. Happy composting!
This is a guest post by Sarah R., an energy & environment professional based in Washington, D.C. For more on these topics, please follow her on Twitter!
Citizen Upgrade is a community of experts covering technology, society, and personal development. Visit us at our website, on Facebook, or on Twitter. Join our mailing list to access more great content and other helpful resources.


We are working to provide quality content and apps for free. Donations can help keep them that way!
Popular Posts

How To: Make a Property Maintenance Log Book
Track and Schedule Upkeep for Your Home or Real Estate Portfolio

We Wrote a Cookbook!
Cooking for Grownups Now Available on Amazon

Happiness Advice the World Needs Right Now
Science-based practices that benefit you and everyone around you
Recent Posts

How To Avoid Exposure to PFAS aka The Forever Chemicals
Protect yourself from the health risks of PFAS chemicals

Upgrade Your Home with Simple Interior Design Updates
7 Steps to a Stylish and Comfortable Home

20 Best Housewarming Gifts for New Homeowners in 2023
From the thoughtful to the practical, we have you covered!

How to Stage Your Home for Sale, A Step-by-Step Guide to Getting Multiple Offers and a Quick Sale
Declutter, Clean, and Make Upgrades to Increase Your Home's Appeal to Buyers

Wabi Sabi- The Japanese Philosophy of Beauty in Imperfection
Apply these life lessons for happiness, fulfillment, and inner peace