How To: Build Terraced Steps in Your Backyard
Upgrade your garden with this medium-skill DIY project
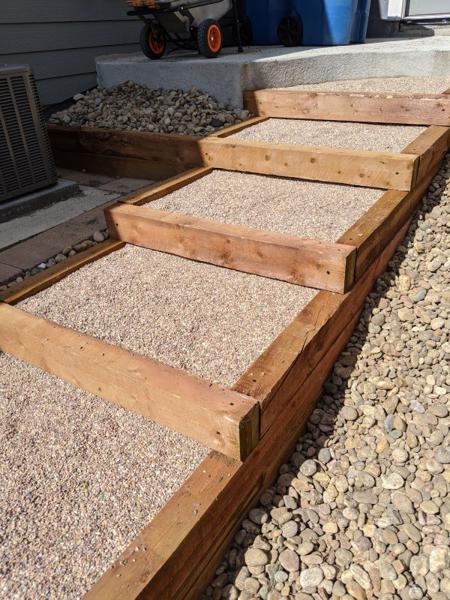
Final layout, Photo by author
Landscaping is hard. It’s also expensive to hire professionals because it’s a lot of work. If you have some reasonable “handyman” skills however, you can build a strong, good looking set of terraced steps yourself.
I did this project over the course of four weekends, usually only a few hours each day, and it cost me about $600. Roughly $450 of that was for the landscaping timbers and $100 of it was for pea gravel. The other materials are pretty cheap.
Here’s how I did it!
The problem

Before steps, Photo by author
This house has a garden-level basement. It has a five foot drop through loose rock from the concrete pad behind the garage to the patio level. Over just a few years, the rocks have slid down the hill onto the air conditioner pad and left bare spots all over. Hauling materials and lawnmowers up and down that slope is a big annoyance. It’s also dangerous.
Steps are the answer. “What kind” is the question.
I’ve always liked the look of “timber” or “railroad tie” landscaping, and it’s one of the easiest outdoor materials to work with. It’s also relatively inexpensive, and replacing them as they wear out is usually not too hard. In wetter climates, this kind of construction doesn’t last as long, but with properly treated lumber, you should get at least seven years out of your timbers before they start to degrade. In a warm, dry climate like mine, I’ve seen them last more than twenty years.
Concrete is another good answer. To make concrete steps, you would do most of the same steps described here to build frames for the concrete. Instead of filling with dirt and gravel, you’d fill with concrete. Then you’d remove the framing and have long-lasting steps. The problems with concrete are: it’s far more expensive and in a long, steep run like this, there’s a high probability of cracking as it ages and as the ground settles.
So I went with timbers.
Step 1: Gather your materials and call the utility companies
Mark your cables, Photo by author
IMPORTANT: Always call before you dig. In my yard, there is a buried coax cable where I was going to dig. I sure wouldn’t want to lose my internet through careless digging, but it could be far more dangerous if there was an underground power cable here and I cut through it. In the US, call 811.
Tool selection, Photo by author
Here are most of the tools I used for this project. You probably already have many of them. If you don’t, the non-powered tools can be purchased inexpensively from discount tool stores in your area.
- Pencil - You’ll be using it a lot to mark the timbers for cutting.
- Corded electric drill - For the landscaping screws. I have a cordless as well for other tasks, but you’ll burn through the batteries trying to use it for the timber screws.
- Circular saw - For cutting the timbers.
- Hand ripsaw - For cutting what the circular saw doesn’t cut well. Using 4x6 lumber, you can cut through it with the circular saw making one cut on each side. If you’re cutting at angles, though, it might just be easier to use the handsaw.
- Mattock - For getting through the dense clay in my region. Maybe you can use a shovel instead depending on your soil conditions.
- Tamper - I have an 8x8 tamper for pounding things flat.
- Level - Any kind will work, but longer is better. Timbers themselves aren’t known for being flat or square, so the more surface you can cover with the level, the closer you’ll get.
- Tape measure - At least ten feet for most projects.
- Hand sledgehammer - Something to pound rebar with.
- Half inch auger bit - To make holes for the rebar.
- Auger bit for your timber screws - Timber screws can come in many different dimensions, just match your auger bit to your screw.
- Landscaping wood preservative - The brown bottle in the photo. Mine was “Copper-Green Brown Wood Preservative”. It’s meant to preserve lumber that will sit on or in the ground.
Step 2: Make a plan
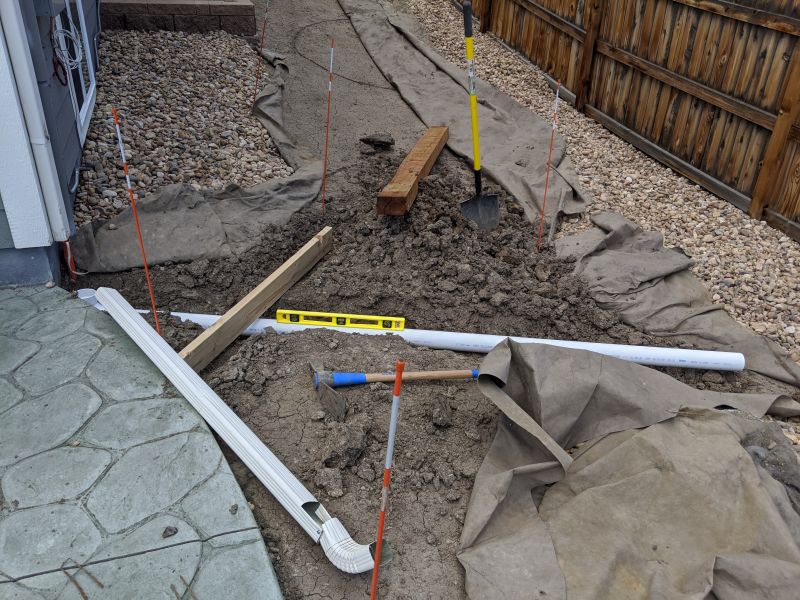
Coming up with a layout, Photo by author
I plotted out where the steps would go with spikes and pieces of lumber to give me an idea. If you look closely, you’ll also see a gutter downspout on the corner of the house that I’d have to move to get water away from both the steps and the house.
My plan was to use 4x6 timbers instead of 6x6 or railroad ties. Having steps six inches tall is a good height, but thinning out the “walls” to 4 inches makes it feel more open and less like you’re walking on construction. You can also cut through a 4x6 with most circular saws by making two cuts, but a 6x6 is too thick for many basic circular saws. Perhaps most importantly, 4x6’s are about half the price of 6x6’s and were actually available in my lumber store.
I wanted my steps to be four feet wide, and I wanted them to be as evenly spaced as possible. To get to the patio, the steps would have to turn, but at that point would be mostly on level ground. I planned to turn that part into a path made of the same material.
For my project, I also wanted to shore up the rock above the air conditioner and had to deal with the drainage situation somehow.
With those goals in mind, I got started clearing the way.
Step 2: Do a test run
Set up the stairs. At a minimum do what I did and set up one side of the stairs. I knew I would be basing the step height off the side nearest the house, that the top had to line up with the concrete pad, and that the bottom path would extend out from the patio.
First rule of thumb: You never want a gap between a timber and the ground. To accomplish this, you must bury up to six inches of timber.
Second rule of thumb: Start from the bottom. You can’t build steps down since each step sits on top of the last one. Build them up from the bottom.
Knowing these two rules, I could dig out from my patio and keep adding timbers until the top surface of the timber was even with the ground.
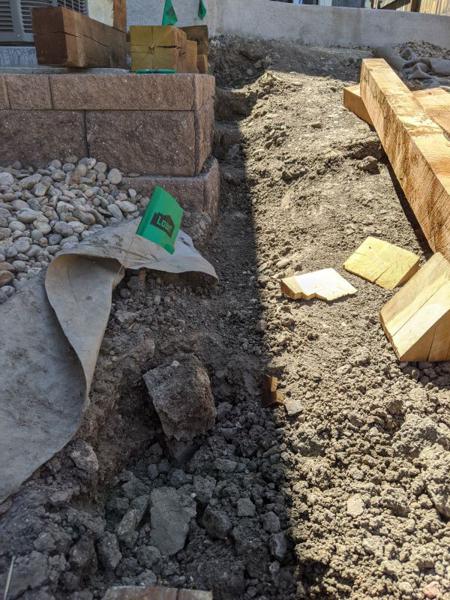
You can see throughout this article how I dug out “channels” for the timbers. That’s by far the easiest way to do it and why a mattock is so good. A shovel digs a much wider path than I’d need, wasting a lot of hard work (I did use the shovel from time to time to fill in gaps or to clear loose dirt).
Drainage layout, Photo by author
For those of you interested in the drainage, it was very simple. That’s a ten foot PVC pipe, a ninety-degree elbow, and a fitting that connects four inch PVC to the downspout. All you have to do is cement the PVC components together and make sure the pipe is angled downward. In this photo, I was using a 2x6 wood plank to make sure the pipe was deep enough that the timbers would pass over it.
Here’s how it looked when I got the base of the path set in place:

Underground drainage, Photo by author
With the base positioned correctly, I could stack up pieces of timbers to represent the staircase:

Test run of first steps, Photo by author
This was my first thought of how to lay out the staircase, but looking at it, it would have been very high off the ground, so I adjusted my plans just by moving timbers around until I liked how it looked.

Second test of step layout, Photo by author
With my base “step” (path) in place and my plan now tested and refined, it was time to:
Step 4: Dig, Level, Screw, and Rebar
I built up the side of the stairs next to the house first. Here are a couple of shots of the process I followed for each piece of timber.
1) Dig out the area you’re going to put the next timber. Remember, you never need to dig more than six inches deep.
Preparing the ground, Photo by author
2) Cut the timber to length, level it, and bed it in something compressible:

Gravel base, Photo by author
During this pandemic, the local stores were out of the normal sand or crushed gravel I would normally use under a timber, so I used pea gravel. I used about one bag of pea gravel for 8 linear feet of timber. Spread it out so the timber rests on top of the pea gravel and use the gravel to make sure there’s a nice even base under the timber as you level it.
3) Treat the cut edge and then install the rebar:
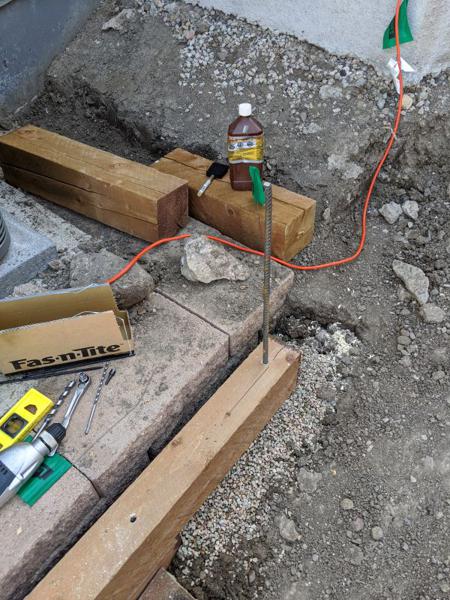
Rebar and wood treatment, Photo by author
Remember to treat any cut edges of your timber with your landscaping lumber treatment. That will help preserve the wood against fungus and rot.
With the timber treated, drill a half inch hole where you want to anchor it and hammer the rebar into place. I used two foot sections of rebar, placing one approximately every three feet when the timber was directly over the dirt. If you choose to sink the rebar through multiple timbers rather than use timber screws (many people do), use longer rebar. At least a foot and a half below the ground should help hold it in place.
4) Add timber screws where the timbers overlap:
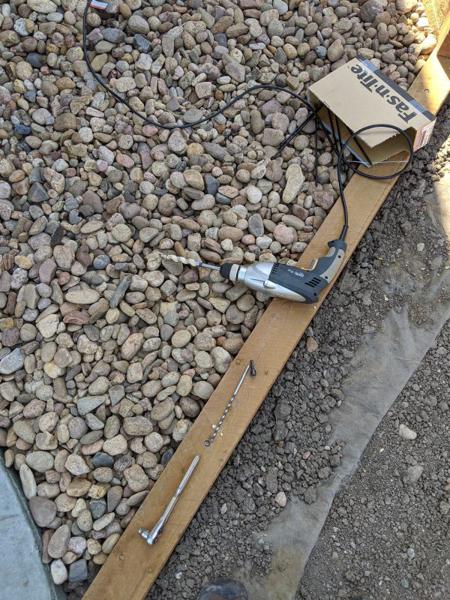
Timber screws, Photo by author
Here are the tools of the trade. A corded electric drill (with the half inch bit in it here), the thin auger for the timber screws, a box of timber screws, and I used a ratchet to finish off the screw if necessary
Go through those steps over and over again, and soon enough, one side of your stairway is complete.
One side in place, Photo by author
For my special case, I have a timber behind the air conditioning unit as well. That’s held in place the same way as the rest, but with the addition of two timber screws coming from the staircase into it to anchor it into the staircase. I have it lined up with the stairs so that step will be part of the wall there, giving that mini-wall even more stability.
While building, I kept a 4x6 handy to put where the step would go to get a sense of the step location, angle, and level. Keep doing test runs as you build.
There’s nothing different about the other side of the staircase. Build it in exactly the same way, making sure timbers are level as you go and using a timber to check the step position and level. While building up, you can add the front face of the steps. These are just screwed in with timber screws. One goes down into the staircase on each side and one goes laterally into the staircase.
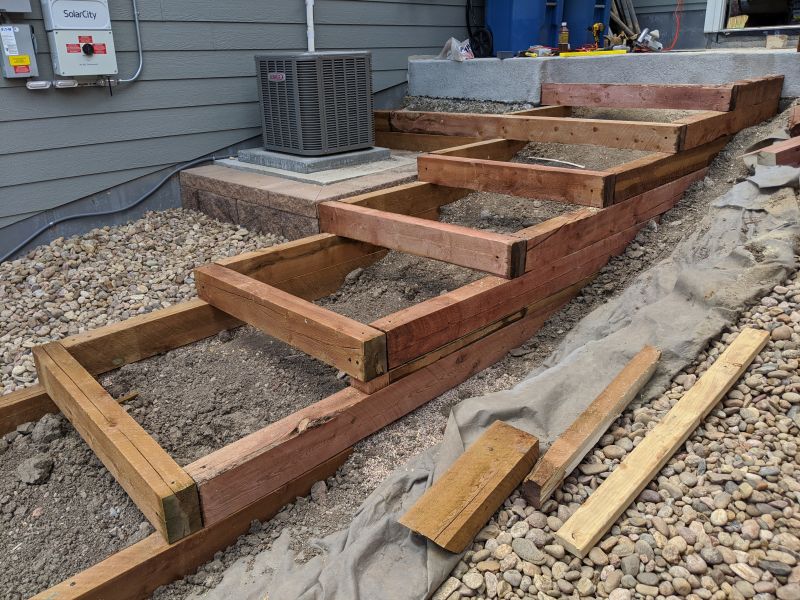
Stacking up the other side, Photo by author
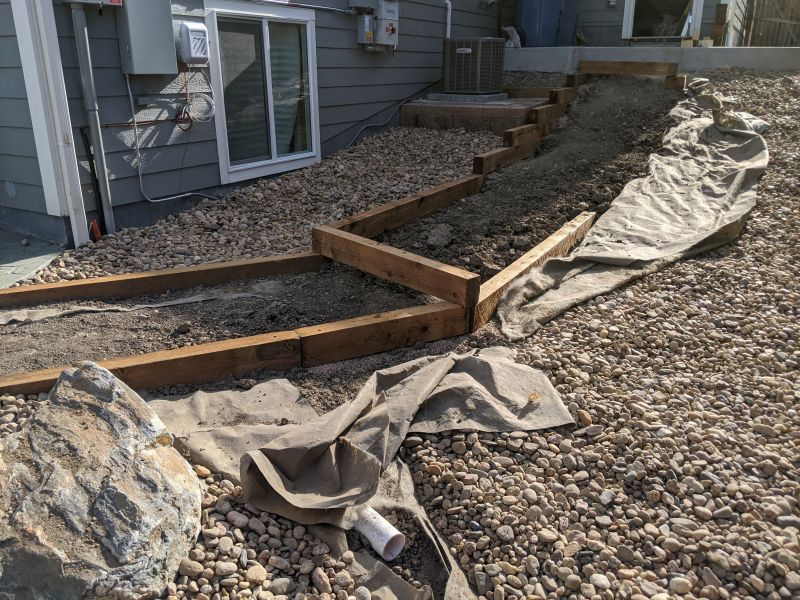
In this photo, you can see the completed framing work as I go up the hill. You can also see the one big mistake I made. I didn’t get one of the timbers as level as I should have in the ground, so I needed to either start over and raise those timbers or make a shim to level the steps. I made a shim. You can easily see it from the side here sitting under the fifth step from the top. I didn’t “test as you go” as often as I should have here. Don’t be me.
Overall, this layout is still a little higher off the ground than normal steps would be. That was necessary for me to keep the step lengths longer and to match up with the concrete that is over a foot above the ground. For many people, you could keep the steps lower and not need as much fill dirt.
Step 5: Fill it in

Glamor shot and nearly busted springs, Photo by author
I needed a lot of fill dirt. Luckily, I had friends who were landscaping their backyard as well and had too much dirt, so I helped them remove about three truck-loads of it.

Just needed a little more dirt, Photo by author
That got me ninety percent of the way there, and then I bought several bags of $1 dirt from the hardware store to level everything off.

Leveling the dirt, Photo by author
Make sure to tamp everything as flat as you can. The less it settles due to rain and traffic, the less you’ll have to touch it up later.
Step 6: Ground barrier and rock
Once your dirt is in and tamped down, you can add a barrier cloth. This is meant to keep weeds from growing up between the rocks, but it will also help prevent the rocks from sinking into the dirt over time.

Weed barrier, Photo by author
Just lay the cloth out over the step and cut it with a blade while it’s in position. Use landscaping stakes to keep it in place. It doesn’t have to be perfect and doesn’t need to tuck up under the edges. Nothing fancy is required, just enough to cover most of the surface.

Finished weed barrier, Photo by author
With that in place on each step, you can start adding the rocks.
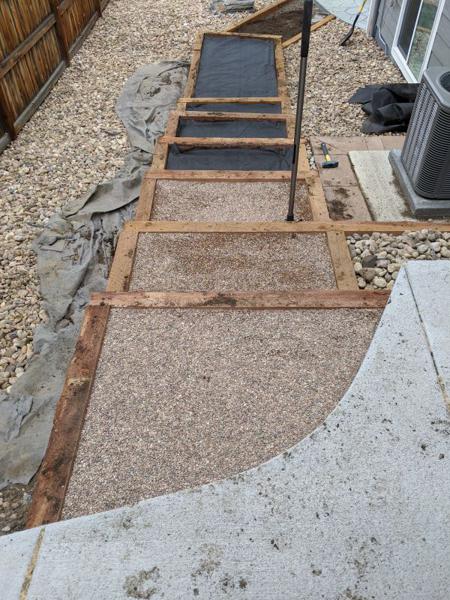
Adding pea gravel base, Photo by author
Tamp down the rock as much as you can. Pea gravel will never settle perfectly, but tamping it will keep most of it in the right place. I may go back later and add some flagstone or other flat surface if I decide I don’t like walking on the pea gravel. I would certainly recommend that for a higher traffic area, but this path only gets used to move things around on weekends, mostly by me.
Step 7: Tidy up

All done, Photo by author
Make sure to clean up the sides of your project and take a good picture to show off to friends and family. You’re done!
Citizen Upgrade is a community of experts covering technology, society, and personal development. Visit us at our website, on Facebook, or on Twitter.
We are working to provide quality content and apps for free. Donations can help keep them that way!
Popular Posts

How To: Make a Property Maintenance Log Book
Track and Schedule Upkeep for Your Home or Real Estate Portfolio

We Wrote a Cookbook!
Cooking for Grownups Now Available on Amazon

Happiness Advice the World Needs Right Now
Science-based practices that benefit you and everyone around you
Recent Posts

How To Avoid Exposure to PFAS aka The Forever Chemicals
Protect yourself from the health risks of PFAS chemicals

Upgrade Your Home with Simple Interior Design Updates
7 Steps to a Stylish and Comfortable Home

20 Best Housewarming Gifts for New Homeowners in 2023
From the thoughtful to the practical, we have you covered!

How to Stage Your Home for Sale, A Step-by-Step Guide to Getting Multiple Offers and a Quick Sale
Declutter, Clean, and Make Upgrades to Increase Your Home's Appeal to Buyers

Wabi Sabi- The Japanese Philosophy of Beauty in Imperfection
Apply these life lessons for happiness, fulfillment, and inner peace